are done and kitted! :)
What a productive weekend. In addition to getting my favors completed and the workshop prepped, I was able to start my project for Inspiration Unlimited.
Here are three of the four little favors we will be making in May.
I used printed paper from the Teresa Collins Save The Date paper line for the band and sturdy Bazzill/American Crafts cardstock for the little triangle shaped treat holder. If you haven't used this paper line from Teresa, you are in for a treat...it's textured! I made a pennant with Bazzill/American Crafts glitter tape. I am so addicted to this glittery stuff! Some custom print work and a lace bow adorn this favor.
Sticking with Teresa's Save The Date paper line, I positioned a section of this printed paper onto my Bazzill/American Crafts cardstock sturdy little itsy bitsy treat box. A little black and white baker's twine and a custom "thanks" banner completed this little favor. This little guy would be perfect for wedding or reception favors. It's a lidded one piece box that holds only a small amount of treats so you could fill it with your best chocolate before gifting.
The polkadotted box was created with the cute Jen Allyson paper line Cut & Paste from My Minds Eye. Yea, it's my latest addiction. This little flapped lid box is a cinch to assemble, yet stinkin cute to hold gift cards, prewrapped baked goods or candy. A sweet little glitter paper punched heart, a Studio 61 Doiley and gray seam binding add to the cute factor of this favor. The little "WITH LOVE" tag is a stamp that was stamped onto Bazzill/American Crafts cardstock.
This fourth cute little hanging favor is made from the Daily Flash Girl Talk paper line by October Afternoon. It's the perfect size to hold 2 mini TWIX bars and who doesn't like TWIX? Solid pink baker's twine is used to create a little ribbon bundle just under the hanging ribbon. A little "Hello" stamp was stamped onto Bazzill/American Crafst cardstock and placed on the front of the favor.
Still 5 spots open if you would like to join me at the May 6th Do Me A Favor workshop at ETC. If you sign up on line at
http://shop.scrapbooks-etc.com/collections/classes/products/05-06-14-do-me-a-favor-6-8pm
you will receive 10% off!
With my projects done, I still have time to toss a load or two of laundry in the wash and relax before the work week starts again.
Here's to a fabulous week!
Kelli
:)
Sunday, April 27, 2014
Monday, March 24, 2014
Ahead of the game
Boy, I am acting more and more like my mom each day {and that's a good thing!}. She is always well prepared and has things finished early! My class projects for April 1st's Do Me A Favor are on display at ETC and the kits are done! Only 3 spots left, so don't delay. If you are a local gal {or guy...come on Dale, I haven't seen you or Ernestine lately} looking for something to do a week from tomorrow nite, come join me for this workshop.
Here's a sneak peek at the projects we will be making.
Well, now onto a few other projects. I am going to keep this momentum going...I like being ahead of the game!
Have a super week and take time to be creative!
Kelli
:)
Here's a sneak peek at the projects we will be making.
![]() |
| This little chick is all Bazzill! Well minus the ribbon and wiggly eyes. This clever little chick would be perfect as an Easter place setting...Paula, I already see them on your Easter Brunch table! |
![]() | ||
| This little glassine bag is perfect for showing off the BE LOVED paperline by Fancy Pants. I love all the cute spring colors used in this papeline. It sure made embellishing this favor a cinch! |
Have a super week and take time to be creative!
Kelli
:)
Sunday, March 2, 2014
Last Double Digit Post
Hard to believe, but my next post will be my 100th!
2014 has really flown by so far. I hope the last 10 months of the year don;t seem to go quite as fast.
Last weekend I taught at Create 2014 and really had a great time. The classes were small and intimate, which is always much more relaxed. :) The projects were fabulous and the attendees were amaZing! So glad I was part of the event this year.
I am gearing up to teach Do Me A Favor on Tuesday and The Club with Amy Totty on Wednesday night. A few of you have been asking about the projects for Tuesday. Sorry I haven't posted a pic before now, this past week has been hectic. But here goes...
My favorite little favor is the sweet pink and kraft chevron box made from My Minds Eye printed paper and lined with Bazzill cardstock. My neice is getting married soon and I would love to talk her into these for the shower or the wedding. They look so cute. The adorable little tags were found here http://ohsoverypretty.com/2013/04/22/free-calligraphy-hang-tag-printable/
There are four varieties of tags: {just for you}, {happy birthday}, {thank you} and {you're the best}. The duo over at Oh So Very Pretty are mega talented and share the cutest stuff. :)
I thought I would package the kits using a St Patty's Day Theme, and here's what I came up with.
Such a great feeling to be starting off the week all kitted and ready to roll!
2014 has really flown by so far. I hope the last 10 months of the year don;t seem to go quite as fast.
Last weekend I taught at Create 2014 and really had a great time. The classes were small and intimate, which is always much more relaxed. :) The projects were fabulous and the attendees were amaZing! So glad I was part of the event this year.
I am gearing up to teach Do Me A Favor on Tuesday and The Club with Amy Totty on Wednesday night. A few of you have been asking about the projects for Tuesday. Sorry I haven't posted a pic before now, this past week has been hectic. But here goes...
My favorite little favor is the sweet pink and kraft chevron box made from My Minds Eye printed paper and lined with Bazzill cardstock. My neice is getting married soon and I would love to talk her into these for the shower or the wedding. They look so cute. The adorable little tags were found here http://ohsoverypretty.com/2013/04/22/free-calligraphy-hang-tag-printable/
There are four varieties of tags: {just for you}, {happy birthday}, {thank you} and {you're the best}. The duo over at Oh So Very Pretty are mega talented and share the cutest stuff. :)
I thought I would package the kits using a St Patty's Day Theme, and here's what I came up with.
Such a great feeling to be starting off the week all kitted and ready to roll!
Wednesday, January 22, 2014
Create 2014 Excitement is Building!
Yep, it sure is. As I look at my completed project, I am loving how it turned out. Which is ALWAYS a good sign. You know how when you finish up a project you know right away it is fabulous {or needs improvement}? That is the way I create. And boy have I come up with some bad first attempt projects. My only rule is to toss those and start completely over. It's actually alot more rewarding than trying to rework a hot mess. :/
A few of you have been wondering and asking what my project is doing to be, so I thought it really is time to share a sneak peek.
My project assignment was a banner. Because I have a banner or two already, I thought it might be fun to put make a banner with a twist to it. Inspired by a recent girls trip to California, I made this little banner that is perched on a wooden stand. The stand that is pictured is a 12" wide one, but thanks to a friend {Lori}the one we are making in the workshop will be 16" wide! Which means students will be able to add a few panels if they like, or add ribbon, trim/ lace or seam binding in between the panels. The banner is embellished with oodles of vintage one-of-a-kind items and a fun mix of current product. The printed paper is none other than My Mind's Eye, which is certainly one of my favorite printed paper lines in the scrapbooking and papercrafting world! The neutral colors will fit in with any decor and this narrow little stand will look great at the office, in a craft studio or the kitchen window sill.
Now that the fun part {the creating} is over...now comes the dreaded part {the instructions}...wish me luck on getting that done painlessly!
But once that's out of the way...let the kitting begin.
A few of you have been wondering and asking what my project is doing to be, so I thought it really is time to share a sneak peek.
My project assignment was a banner. Because I have a banner or two already, I thought it might be fun to put make a banner with a twist to it. Inspired by a recent girls trip to California, I made this little banner that is perched on a wooden stand. The stand that is pictured is a 12" wide one, but thanks to a friend {Lori}the one we are making in the workshop will be 16" wide! Which means students will be able to add a few panels if they like, or add ribbon, trim/ lace or seam binding in between the panels. The banner is embellished with oodles of vintage one-of-a-kind items and a fun mix of current product. The printed paper is none other than My Mind's Eye, which is certainly one of my favorite printed paper lines in the scrapbooking and papercrafting world! The neutral colors will fit in with any decor and this narrow little stand will look great at the office, in a craft studio or the kitchen window sill.
Now that the fun part {the creating} is over...now comes the dreaded part {the instructions}...wish me luck on getting that done painlessly!
But once that's out of the way...let the kitting begin.
Monday, January 13, 2014
Looking ahead
I am really looking forward to Create 2014 in February at ETC. I always enjoy these smaller sized events because we get to interact alot with everyone at the workshops.
Not sure if I am allowed to share a little "sneak peek" of my project, so I am just sharing a tiny glimpse. I will be using lots of one-of-a-kind pieces and vintage finds to create this little masterpiece. My Mind's Eye printed paper, seam binding, glass glitter and many other little parts and pieces adorn this little project. Can't wait to share the whole project with you...soon...I promise! :)
Almost time to start kitting...the event is February 21st and 22nd.
Until then, I am creating more Valentine's Day favors.
Love this little one. I simply resized the Studio 61 mini white paper sacks and wrapped them with printed paper and added a Studio 61 tag and doiley. I love that they are quick and easy to create.
Here's to a creative week,
Kelli
:)
Not sure if I am allowed to share a little "sneak peek" of my project, so I am just sharing a tiny glimpse. I will be using lots of one-of-a-kind pieces and vintage finds to create this little masterpiece. My Mind's Eye printed paper, seam binding, glass glitter and many other little parts and pieces adorn this little project. Can't wait to share the whole project with you...soon...I promise! :)
Almost time to start kitting...the event is February 21st and 22nd.
Until then, I am creating more Valentine's Day favors.
Love this little one. I simply resized the Studio 61 mini white paper sacks and wrapped them with printed paper and added a Studio 61 tag and doiley. I love that they are quick and easy to create.
Here's to a creative week,
Kelli
:)
Sunday, December 29, 2013
Valentine's Day Favors
Cupid has been hard at work here at Studio 61, creating lots of little favors for gifting.
This tag is created using the printed paper from Pebbles new Yours Truly line, it's matted onto Bazzill cardstock for durability. A mini white Studio 61 envelope is cut in half and glued to the front of tag to create a pocket. The envelope is covered with a piece of piece of paper from the Head Over Heels line from Echo Park. And the heart that peeks out of the pocket is created using an EK Success heart punch and another printed paper from Echo Park's Head Over Heels line. The Studio 61 mini white treat sack is filled with treats and then tied shut using lace, ribbon, Studio 61 bead strands and tulle. A little Studio 61 Happy Valentine's Day Tag hangs from the trims.
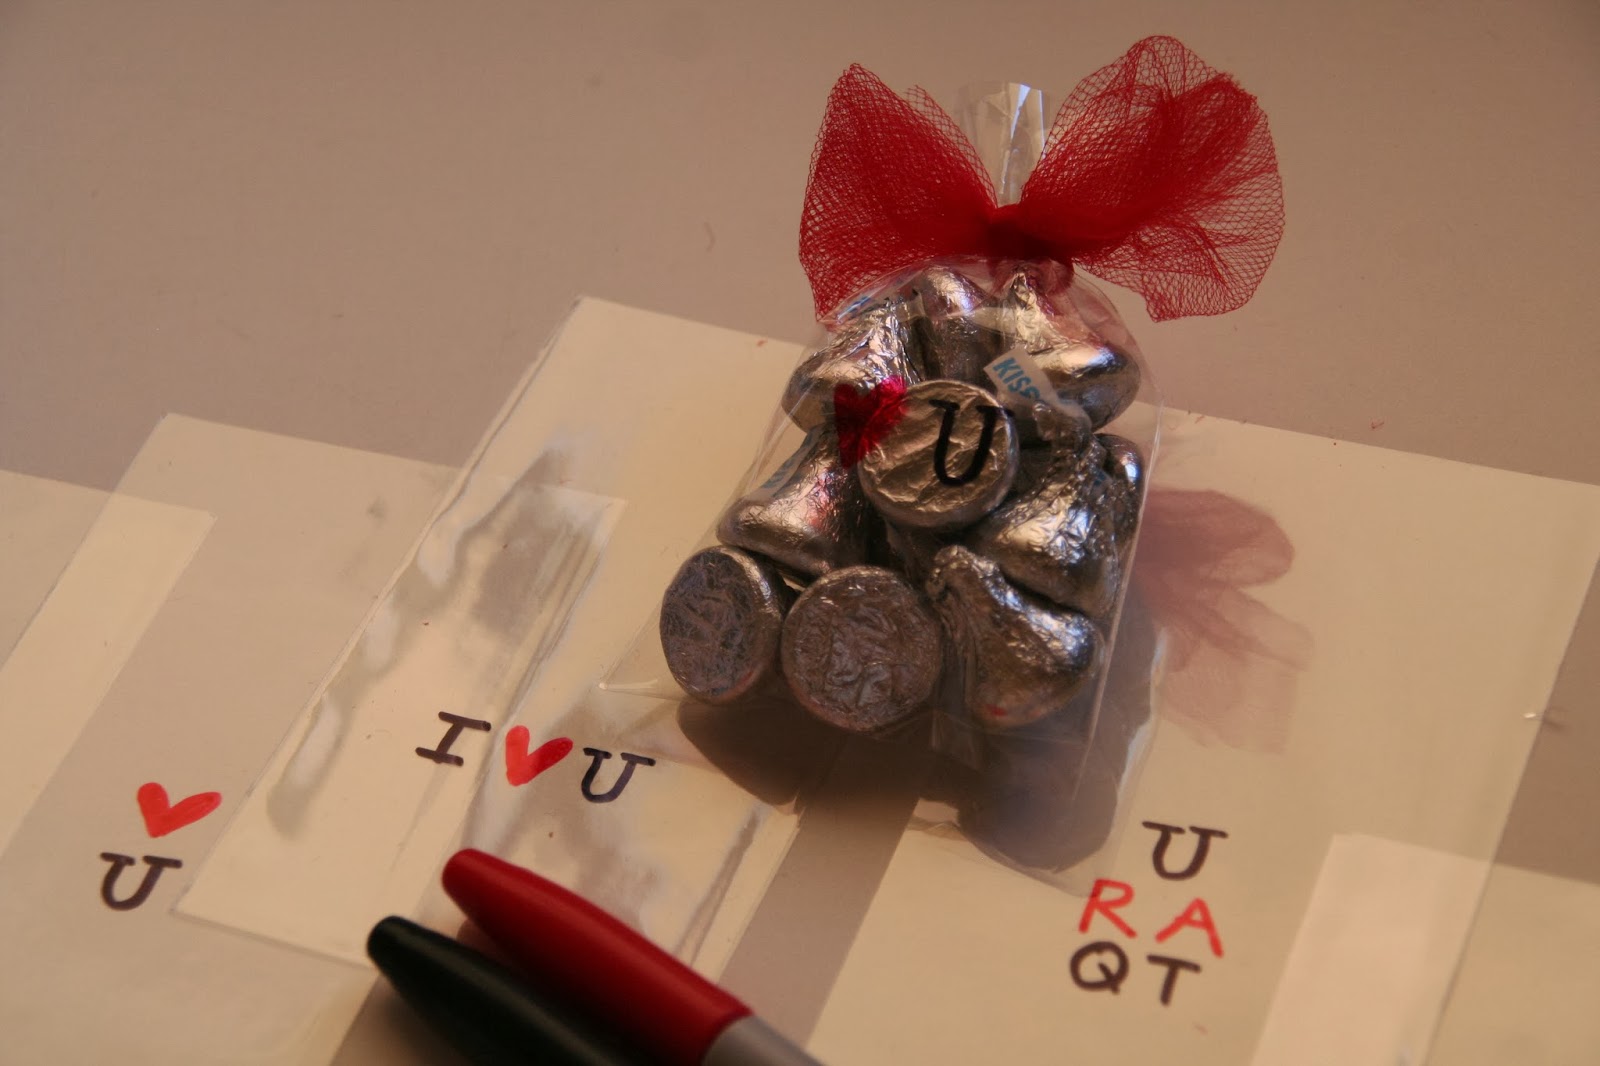
This little see thru 3X5 Studio 61 bag is written on with a black and red sharpie, then filled with kisses and tied close with red tulle. I had drawn little faces on these bags for Halloween and then filled them with lime green treats, creating little monsters. So I decided I would try drawing a heart and a letter for Valentine's Day. This would be a super good project for kids as well as adults!
It's super easy and depending on your drawing and writing talents, you can end up with some super cute treats!
I used the see thru 3X8 Studio 61 bag for this one and tied it closed with a big loopy bow using some Studio 61 valentine red elastic.
This little tall mini Studio 61 favor cup is ready to be filled with chocolate and gifted. I used the Echo Park Head Over Heels paper line to punch a scalloped heart {EK Success}and to create a circular base. The paper is glued to a Studio 61 chipboard base which it the glued to the Studio 61 white lace paper doiley. A little silver tinsel stick is hot glued to the inside of the cup and the Studio 61 Happy Valentine's Day tag is hot glued to the top of it. The heart hangs from the edge of the cup with a piece of white sheer skinney ribbon.
I also created two of the four projects for my Do Me A Favor Workshop that's coming up on January 7th. The first one is a little "take away" container that's adorned with printed paper from the new Be. Loved. paper line form Fancy Pants.
The second one is using the Studio 61 3X8 see thru bag and a Studio 61 vintage mini red pipe cleaner, some ribbon, trims and rick rack from here and there.
As I start to work on the remaining projects, I wonder if they too will end up being Valentine Day ones as well. There is just so much adorable printed paper this year for Valentine's Day that I can't help myself!
And all the while I was creating, I was being supervised by Mr. Jackson.
I am pretty certain he was keeping a close eye on me because I was using chocolate in my treat bags. And last nite while we were out for dinner, he treated himself to two mini chocolate Hershey Santas and a mini chocolate Hershey bar. :/
This tag is created using the printed paper from Pebbles new Yours Truly line, it's matted onto Bazzill cardstock for durability. A mini white Studio 61 envelope is cut in half and glued to the front of tag to create a pocket. The envelope is covered with a piece of piece of paper from the Head Over Heels line from Echo Park. And the heart that peeks out of the pocket is created using an EK Success heart punch and another printed paper from Echo Park's Head Over Heels line. The Studio 61 mini white treat sack is filled with treats and then tied shut using lace, ribbon, Studio 61 bead strands and tulle. A little Studio 61 Happy Valentine's Day Tag hangs from the trims.
This little see thru 3X5 Studio 61 bag is written on with a black and red sharpie, then filled with kisses and tied close with red tulle. I had drawn little faces on these bags for Halloween and then filled them with lime green treats, creating little monsters. So I decided I would try drawing a heart and a letter for Valentine's Day. This would be a super good project for kids as well as adults!
It's super easy and depending on your drawing and writing talents, you can end up with some super cute treats!
I used the see thru 3X8 Studio 61 bag for this one and tied it closed with a big loopy bow using some Studio 61 valentine red elastic.
This little tall mini Studio 61 favor cup is ready to be filled with chocolate and gifted. I used the Echo Park Head Over Heels paper line to punch a scalloped heart {EK Success}and to create a circular base. The paper is glued to a Studio 61 chipboard base which it the glued to the Studio 61 white lace paper doiley. A little silver tinsel stick is hot glued to the inside of the cup and the Studio 61 Happy Valentine's Day tag is hot glued to the top of it. The heart hangs from the edge of the cup with a piece of white sheer skinney ribbon.
I also created two of the four projects for my Do Me A Favor Workshop that's coming up on January 7th. The first one is a little "take away" container that's adorned with printed paper from the new Be. Loved. paper line form Fancy Pants.
The second one is using the Studio 61 3X8 see thru bag and a Studio 61 vintage mini red pipe cleaner, some ribbon, trims and rick rack from here and there.
As I start to work on the remaining projects, I wonder if they too will end up being Valentine Day ones as well. There is just so much adorable printed paper this year for Valentine's Day that I can't help myself!
And all the while I was creating, I was being supervised by Mr. Jackson.
I am pretty certain he was keeping a close eye on me because I was using chocolate in my treat bags. And last nite while we were out for dinner, he treated himself to two mini chocolate Hershey Santas and a mini chocolate Hershey bar. :/
Monday, December 2, 2013
One down....
only 27 to go! LOL. While most of these snowmen won't have a thing to do with recycling, the first one I completed does! This little fella is perched on top of an empty tomato sauce can to help promote reducing, reusing and recycling. His hat is made from a repurposed (and painted) thimble and an old black button. Once I get the others finished up later this week, I will post more pictures.
All this crafting is getting me in the holiday spirit! It's a great time of year to be a crafter. :)
Subscribe to:
Posts (Atom)